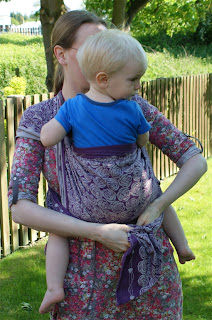
Friday, 31 May 2013

Review: Natibaby Crane Siroku

Brand: Natibaby
Type: Crane Siroku
Blend: 30% hemp, 70% cotton
Size: 6


The appearance of this wrap struck me immediately when I saw a picture of it on Natibaby's Facebook page.  When I realised it was a hemp blend, and most likely toddler-worthy, I decided to place my order.  Crane Siroku is the first in the series of Natibaby's wraps inspired by cultures around the world, this one being inspired by Japan. I love the symbolism behind the crane, and thought I would share Natibaby's explanation:

"Cranes are a symbol of long life as well as good fortune and successful marriage. Japanese legend says it took the crane over 1000 years to fly to the Sun. The crane keeps the same mate for its entire life and that’s why it has become a symbol of longevity, successful marriage, hope and new beginning.
In modern Japan children make tiny origami cranes and link them together to represent world peace. But probably the natural beauty, grace and elegance of the crane combined with its rich symbolism cause it to be used as a motif over the centuries in works of art."


I really love the repeat of the pattern, and the beautiful colour, which appears to be the same purple used in Natibaby's MilkyWay Violet Dreams.  When it arrived, I was slightly alarmed at how stiff and crispy the wrap was.  I put it straight in the wash, and then seam ironed it when almost dry.  I then set to work attempting to tame the beast!  I have braided it many times, and have run it through sling rings a lot, and it is beginning to soften up beautifully.
Although no where near fully broken in, Crane Siroku is already easy to wrap with, and provides a comfortable, rock-sold carry with my 18 month old son.  It glides into place, but also holds its position (more so than most of my other Natibaby wraps), and the hemp provides some cush on my shoulders, although I'm sure as it gets softer, the cush will increase.  It is a lovely, solid wrap, and really easy to use (after a bit of work breaking it in!).  The pattern is really beautiful - I particularly love the 'wrong' side.  I would highly recommend this wrap, and at the time of typing, there are still some available on Natibaby's website.  Just don't be put-off by the feel of it when it first arrives, as it softens up really quickly.  I really love this wrap!


Tuesday, 28 May 2013

Raining Day Babywearing!

A fun picture: typical British Summer weather today!


Monday, 27 May 2013

Tutorial: Back Wrap Cross Carry with Sweetheart Neckline

Tutorial: Back Wrap Cross Carry with Sweetheart Neckline.
Wrap Used: Oscha Eden Copper Beech, size 7
Level of Difficulty: Easy-Moderate

This back carry is one of the first that I learnt how to do.  It is a great multi-layer back carry for children who like to leg-straighten and risk popping their seat.  It isn't particularly complicated, and just takes a little practice.  I've found a size 7 best for this carry, although petite parents with a smaller child may prefer a slightly shorter wrap.


1. Get your child on your back in your preferred way.  You need the middle marker central on their back.  In the same way as my other tutorials, take hold of the two top rails, pull them tight, and secure them under your chin or between your teeth.  This secures your child, and gives you both of your hands to create a good seat.


2.  To create a good seat, take hold of your bottom rail from underneath your child's legs and pull it down to take the slack out of your wrap.  Make sure you are keeping the top rails secure at this time.


3.  Pull the bottom rail up between you and your child, to create a nice, deep seat, making sure the fabric goes from one knee pit to the other.  You may notice that my son has taken one of his arms out of the wrap.  This is fine with an older child who will happily sit on your back.  However, if your child is younger or not particularly cooperative, I would recommend you keep both your child's arms inside the wrap whilst creating a seat, as you don't actually have your hands on your child at this point.


4.  Keeping the fabric pulled tight on both sides, bring both rails off of your shoulders and under your arms.  Try and keep the wrap as far up your child's back as you can.


5.  Secure one tail whilst you work on the other one.  I am stood on my tail with the opposite foot, but you can also hold it between your knees, or under your chin.  Keeping the tension in both sides, bring the fabric across your chest...


6...toward your opposite armpit.  Try and keep the fabric as tight as possible.


7.  Take this tail under your child's leg (this is quite unusual, as with most carries you take the wrap over your child's leg).


8.  Pass the wrap to the other hand and spread it across your child's back and up towards the back of their neck, bringing it to your opposite shoulder.


9.  Gather the wrap at the shoulder, and work along the width to take any slack out of the wrap.


10.  This is a symmetrical carry, so you are now ready to do the same on the other side.  You need to secure the tail which is now over your shoulder whilst working on the other side.  I find it easiest to secure it under my neck on this occasion.


11. With the tail secured under your neck, pull the other tail tightly across your chest...


12....and under your child's leg.


13.  Pass the wrap to your other hand behind your back and spread the fabric over your child's back and up towards the back of their neck.


14. Bring the wrap over your shoulder and pull the fabric tight.


15. You should now have both tails over your shoulders.


16. Spend a bit of time carefully making sure the slack is taken out of the wrap, and it is as secure as you can get it.


17.  Finish the carry by taking the tails around to the back....


18....and tie them under your child's bottom.  If your wrap is long enough, you may be able to take the tails under your child's legs and tie at the front if you prefer.


19.  Adjust the shoulders to make them comfortable.


 Thank you for looking!


Sunday, 26 May 2013

My wrap stash


I've just taken a quick picture of my current wrap collection.  I've sold a few recently, and had a few new arrivals.  I feel so lucky to have all these beautiful wraps.  Part of the fun, for me, is trying out lots of different blends, brands and designs (although I have my favourites of course).  Having said that, I regularly remind myself that you only need one simple wrap or carrier in order to babywear.  Collecting is fun, but having your child close to you is priceless :)

Tutorial: Kangaroo Carry, with flipped shoulders

Carry: Kangaroo Carry with flipped shoulders
Wrap Used: Oscha Juliet Roses, size 2
Level of difficulty: Easy

This is a lovely carry, suitable for any age child, and can be done with a size 2 or 3 woven wrap.  I was only just able to tie it off with my size 2, as my son is getting quite big.  You may prefer to practice this carry with a size 3 at first.  This carry can be done with or without flipping the shoulders.  The advantage of flipping them is that it pulls the top rail in tighter, and helps prevent your child from being able to lean away from you.  


1. Start with your wrap looped across your front, with one end over each shoulder.  My hand is holding the middle marker in this picture.

2.  Place your child in the pouch you've created on your front in your preferred way.  You want the middle marker at the back of your child's neck.


3.  Create the seat by bringing the bottom rail of the wrap up between you and your child.


4.  Make sure the wrap extends from one of your child's knee pits to the other one.  Make sure your middle marker is still central.


5.  Using one hand to support your child's weight under their bottom, use the other hand to flip the shoulders of your wrap.  You do this by reaching under the shoulder piece of your wrap and taking hold of the rail nearest to your neck......


6.  ......and pulling it through to the outside of your shoulder.  The wrong side of your wrap should now be facing outwards on the shoulder.  Adjust the fabric on your shoulder to make it comfortable.


7. You will need to swap the hand supporting your child's weight, and reach behind you to take hold of the side you have just flipped.  Work along the width of the wrap, making sure you pull each bit tight and taking all the slack out of the wrap.


8.  Bring that tightened side around to the front, over your child's leg, and to the middle under your child's bottom.  You need to make sure you now hold this tail tight whilst adjusting you other side.


9.  Holding the tightened tail under your child's bottom,and also supporting their weight with that hand, prepare to flip the other shoulder piece, by putting your other hand under the wrap and taking hold of the rail nearest to your neck.


10.  Bring that rail under and through to the outside, in the same way as you did the other side.  Adjust the wrap so that it is comfortable on your shoulder.


11.  Once again, reach behind you and take hold of the wrap.  Again, work along the width of the wrap to pull it all tight and take any slack out of the wrap.


12. Bring it round to the front, over your child's leg, so that it meets the other tail under your child's bottom.  Adjust the shoulders so that they are comfortable.


13.  Again make sure you have pulled all the slack out of each side.


14.  Tie a double knot.  If you're using a longer wrap, you could take this round to the back under your child's legs, and tie at the back. 


15.  As you can see my son got his arms out whilst I was tying.  This isn't a problem, and I've just tucked them in at the end.  For a much younger child, you will probably want to make sure the wrap is up to their neck the whole time you are tying, so that they are fully supported.  This is particularly important for a child who doesn't yet have good head control.


Please let me know if you've found this tutorial helpful, or if there is a specific carry you would like me to make a tutorial for.  Thank you for looking :)


Saturday, 25 May 2013

Photo fun :)


I've been having a bit of fun with my photo editing software.  I'm quite pleased with this one.

I hope you're all having a lovely bank holiday weekend, and getting the chance to wear your little ones!
  
I'm hoping to do another wrapping tutorial for the blog tomorrow, as long as Joey is a willing volunteer.