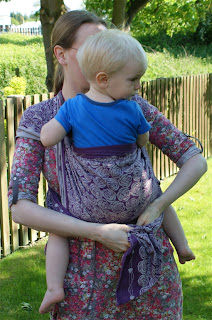
Wrap Used: Oscha Juliet Roses, size 2
Level of difficulty: Easy
This is a lovely carry, suitable for any age child, and can be done with a size 2 or 3 woven wrap. I was only just able to tie it off with my size 2, as my son is getting quite big. You may prefer to practice this carry with a size 3 at first. This carry can be done with or without flipping the shoulders. The advantage of flipping them is that it pulls the top rail in tighter, and helps prevent your child from being able to lean away from you.

1. Start with your wrap looped across your front, with one end over each shoulder. My hand is holding the middle marker in this picture.
2. Place your child in the pouch you've created on your front in your preferred way. You want the middle marker at the back of your child's neck.
3. Create the seat by bringing the bottom rail of the wrap up between you and your child.
4. Make sure the wrap extends from one of your child's knee pits to the other one. Make sure your middle marker is still central.
5. Using one hand to support your child's weight under their bottom, use the other hand to flip the shoulders of your wrap. You do this by reaching under the shoulder piece of your wrap and taking hold of the rail nearest to your neck......
6. ......and pulling it through to the outside of your shoulder. The wrong side of your wrap should now be facing outwards on the shoulder. Adjust the fabric on your shoulder to make it comfortable.
7. You will need to swap the hand supporting your child's weight, and reach behind you to take hold of the side you have just flipped. Work along the width of the wrap, making sure you pull each bit tight and taking all the slack out of the wrap.
8. Bring that tightened side around to the front, over your child's leg, and to the middle under your child's bottom. You need to make sure you now hold this tail tight whilst adjusting you other side.
9. Holding the tightened tail under your child's bottom,and also supporting their weight with that hand, prepare to flip the other shoulder piece, by putting your other hand under the wrap and taking hold of the rail nearest to your neck.
10. Bring that rail under and through to the outside, in the same way as you did the other side. Adjust the wrap so that it is comfortable on your shoulder.
11. Once again, reach behind you and take hold of the wrap. Again, work along the width of the wrap to pull it all tight and take any slack out of the wrap.
12. Bring it round to the front, over your child's leg, so that it meets the other tail under your child's bottom. Adjust the shoulders so that they are comfortable.
13. Again make sure you have pulled all the slack out of each side.
14. Tie a double knot. If you're using a longer wrap, you could take this round to the back under your child's legs, and tie at the back.
15. As you can see my son got his arms out whilst I was tying. This isn't a problem, and I've just tucked them in at the end. For a much younger child, you will probably want to make sure the wrap is up to their neck the whole time you are tying, so that they are fully supported. This is particularly important for a child who doesn't yet have good head control.
Please let me know if you've found this tutorial helpful, or if there is a specific carry you would like me to make a tutorial for. Thank you for looking :)


Thank you! I have been looking for a comfy front carry to use with my size 2s. I thought my daughter (2 1/2) exclusively wanted to be back carried but when she's tired or clingy she has now started asking for "tummy" so this is perfect!
ReplyDeleteThats great! My son is a tall 20 month old, and definitely still loves front and hip carries :)
Delete